
Anger Art Therapy Activity: DIY Origami Box Step-by-Step Instructions
- Whole Child Counseling
- Aug 18, 2025
- 13 min read
Updated: May 14
Are you looking for a hands-on therapeutic art activity that’s simple, calming, and packed with creative potential for an anger art therapy activity or to be used with other art therapy interventions? This two-piece origami box is easy to make with just paper. No tape or glue are even needed, but you can use that if you want. This is a great activity for counseling groups, individual counseling sessions, or can be used as a therapeutic art activity. This post may contain affiliate links. I may earn a commission at no extra cost to you.
One of the reasons I love using boxes in counseling is because they are naturally containing, both physically and symbolically. In counseling or therapy, containment refers to the emotional holding space we create for clients. It’s about helping kids feel safe enough to express what they’re feeling, knowing that they won’t be overwhelmed by those emotions or judged for having them.
Boxes reflect that idea perfectly. They provide boundaries. They hold things in. They give form and structure to something that might otherwise feel too big, too messy, or too hard to name. This is why when I first started to create grief kits for kids I knew I needed to contain them inside boxes (even though bags would have been cheaper and easier.)
When counseling children, we often help kids "put feelings into words" or give shape to experiences that feel unmanageable. A box helps make that idea concrete. For example:
A worry box or unhelpful thought box allows kids to "place" their worries somewhere safe, giving them symbolic control over thoughts that might otherwise feel intrusive or constant.
An emotion box lets kids explore the difference between what they show on the outside and what they feel on the inside. This is a great intervention for an anger management session.
A containment box can be used with kids who have experienced trauma or overwhelming situations or emotions. By decorating and personalizing the box, they create a symbolic space that feels safe, private, and secure.
Containment can also refer to the process of holding distress for a child until they can hold it themselves. Just like a caregiver "holds" a baby’s distress with calm presence, we use containment in counseling to help kids regulate and process big feelings.
So when we fold paper into a box, when we press down the edges, crease the corners, and shape something from a flat surface into a container, we’re modeling that same process. We’re creating a safe space for emotions to live that doesn’t feel scary or chaotic.
Before creating this project with children in a therapeutic setting, please practice making a few boxes yourself. Here is a video you can also watch with step by step instructions for creating your origami box:
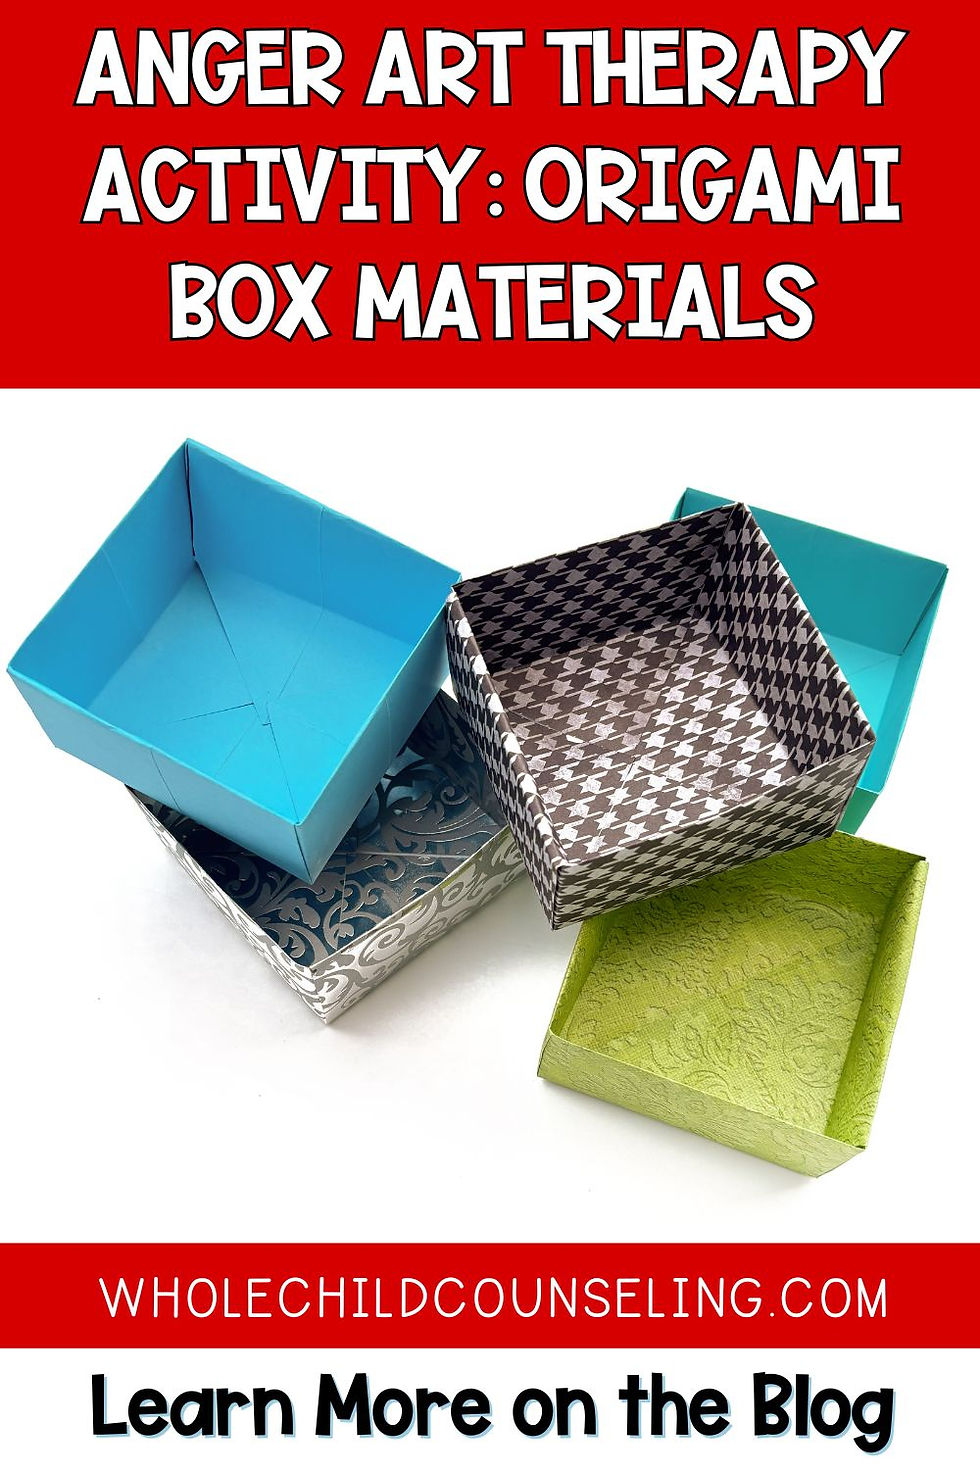
Anger Art Therapy Activity: Origami Box Materials:
2 Square pieces of paper. 12x12 scrapbook paper works best. Avoid thick paper, like cardstock, or embossed paper, as it may be challenging for children to fold.
Scissors
Other art supplies to decorate the box such as glue, tape, oil pastels, markers, stickers, collage images and words, decorative papers, washi tape, paint, etc.
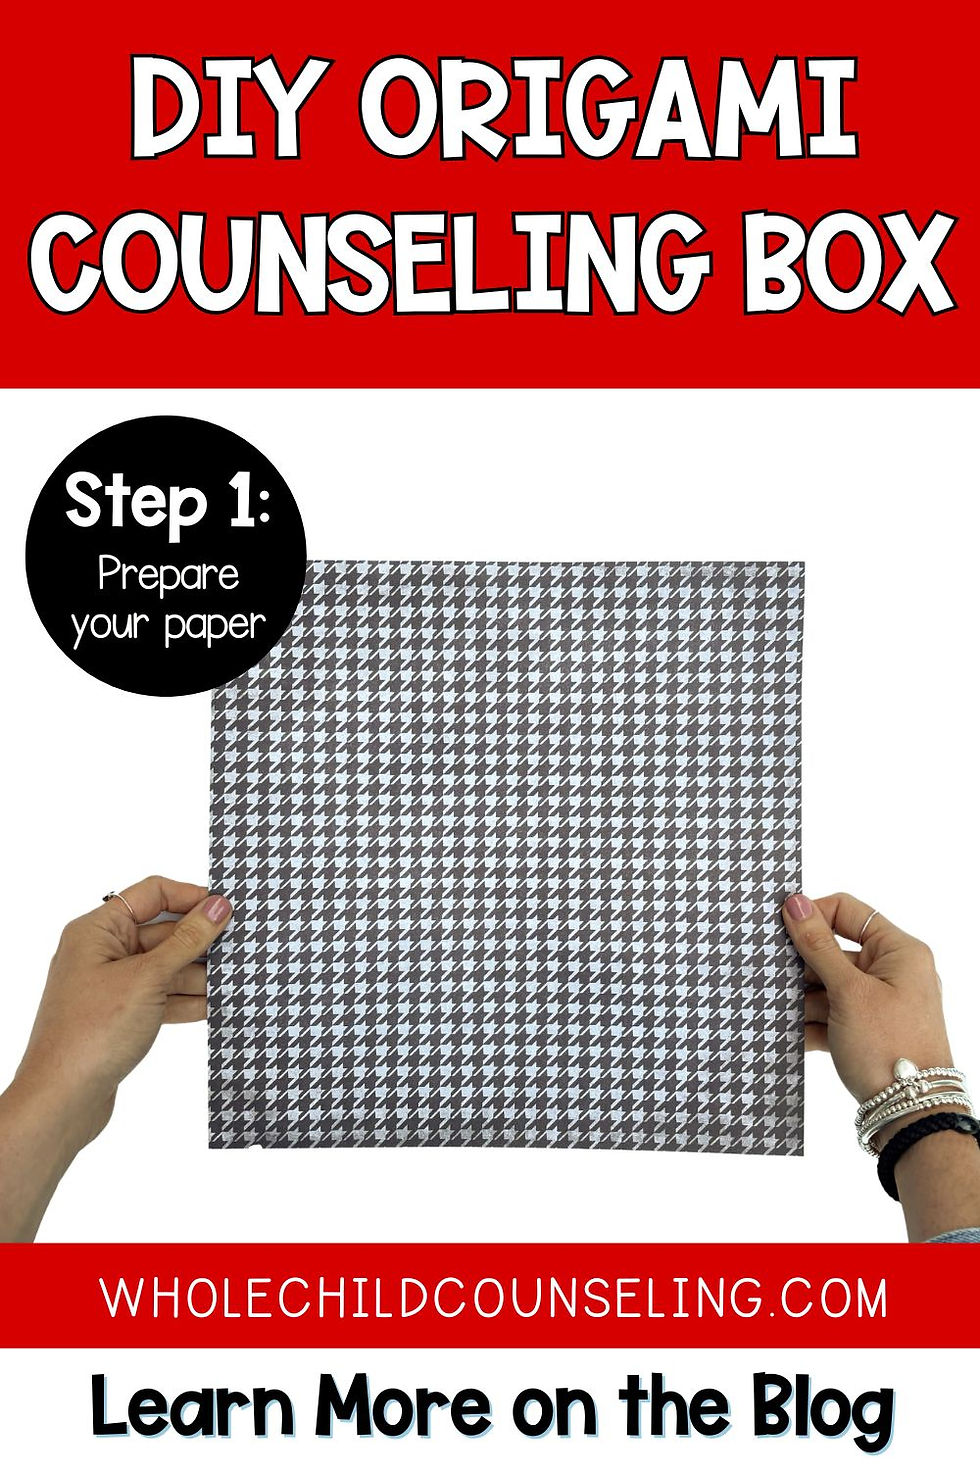
Origami Box Step 1: Prepare Your Paper
You need to start with a square piece of paper. So if you’re using an 8.5x11" paper, fold one corner diagonally to the opposite edge to form a triangle.
Then, cut off the extra rectangle so you are left with the square.

Origami Box Step 2: Make the Base Folds
If your paper has a pattern on it, place the pattern face down so you can't see it.
With your square piece of paper, place the square in a diamond position with the pointed corner facing you.
Fold it in half from corner to corner and smooth the crease. Open the paper back up again.
Now, fold the opposite corners together, end to end, and smooth the crease. Open it back up again.
You should see an “X” crease pattern. It can be helpful to place a dot where the X meets in the middle.

Origami Box Step 3: Fold the Edges to the Center
Fold one corner of the square to the center crease where you placed your dot. Repeat on the opposite corner.
Now, rotate the paper and fold the other two remaining corners into the center.
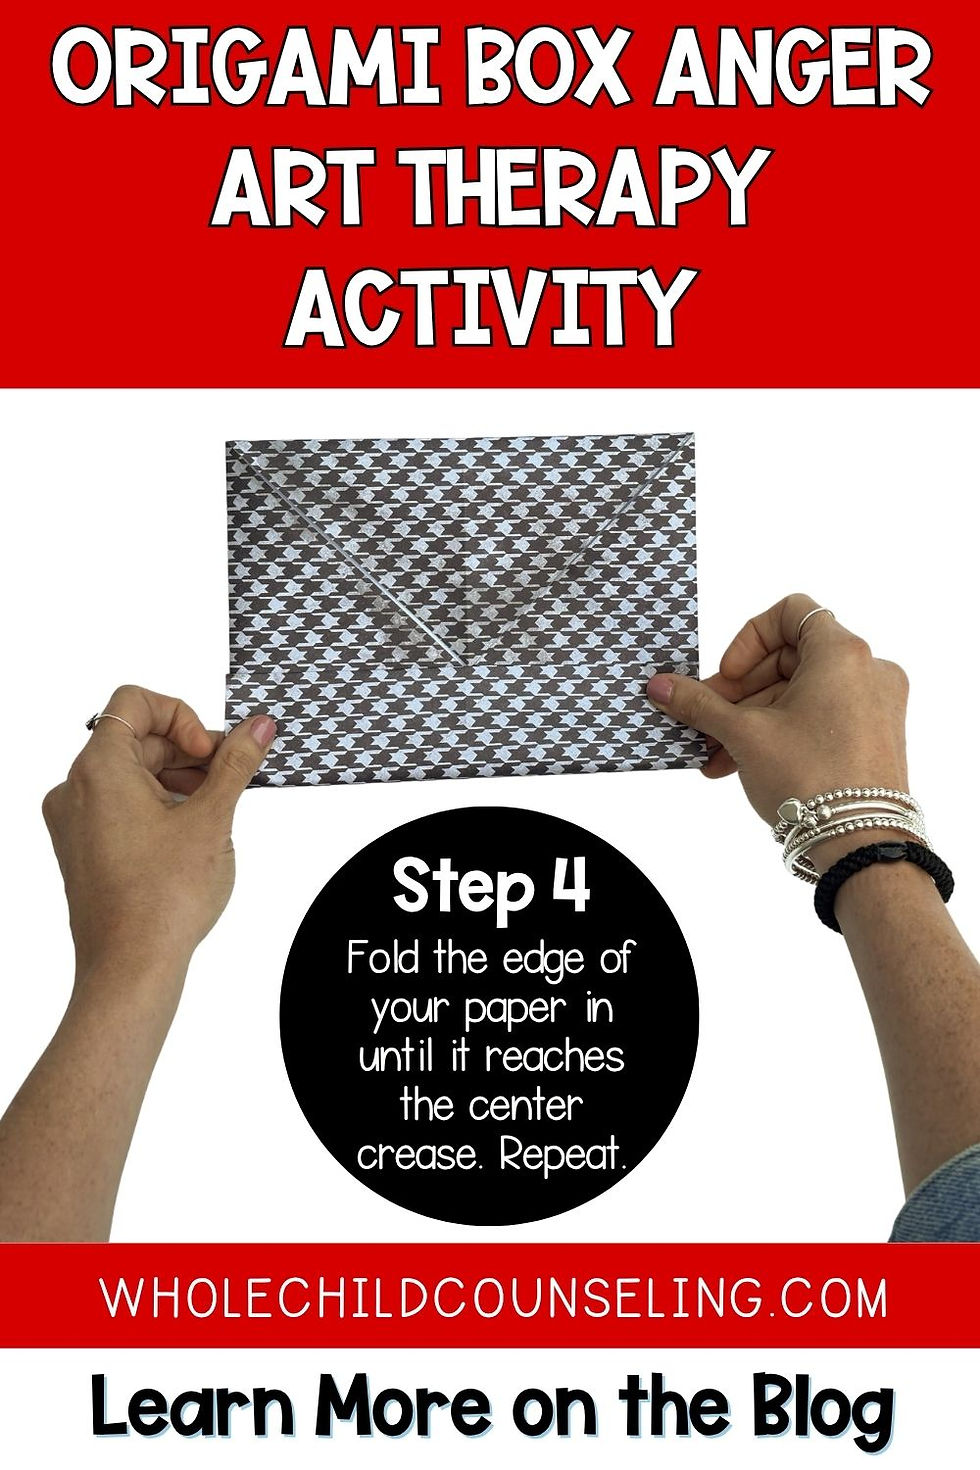
Origami Box Step 4: Fold Like a Book
Next, fold the edge of your paper in until it reaches the center horizontal crease. Repeat on the opposite side, so it touches in the middle.
Unfold the last two folds you just made. Turn your square and next you will do the same thing going in the other direction. Fold the other edge of your paper in until it reaches the center horizontal crease. Repeat on the opposite side, so it touches in the middle.

Origami Box Step 5: Check Your Work
Unfold the last two folds you just made and turn your square over.
You can check your work at this point. You should now have a grid of 4x4 squares.

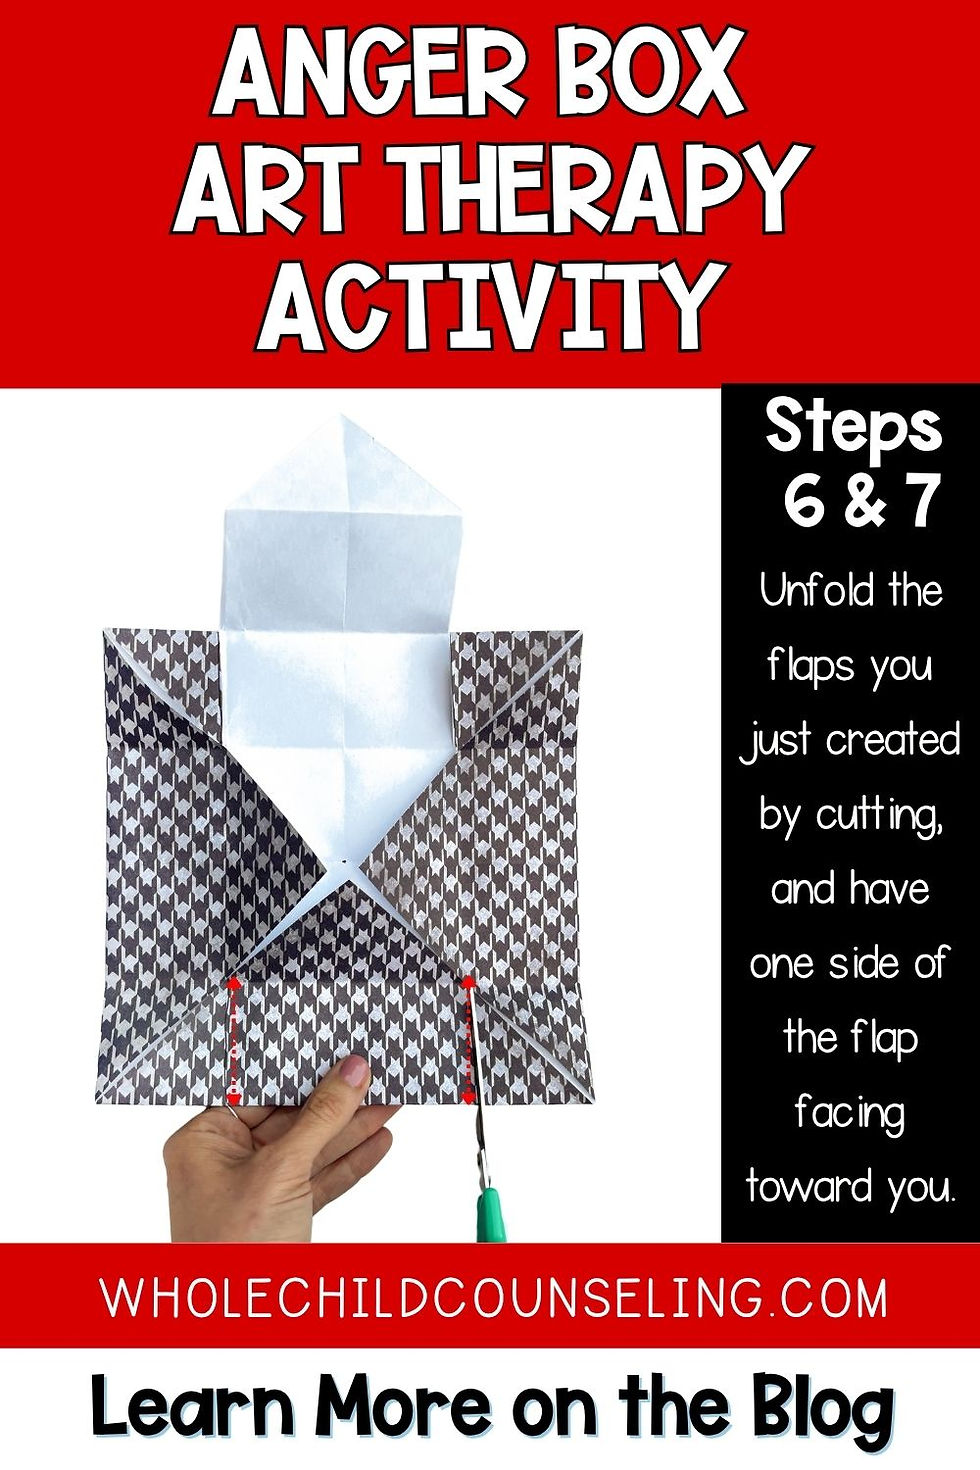
Origami Box Step 6: Make Your Cuts
Flip your paper back over so you can see the four triangles folded in.
Using scissors, make 4 small cuts total, each only one square deep, two on each of the opposite sides of the paper (see red marks on the photo.) If making this with children, use a pen or pencil to draw where they will cut the paper.
Origami Box Step 7: Fold the Box
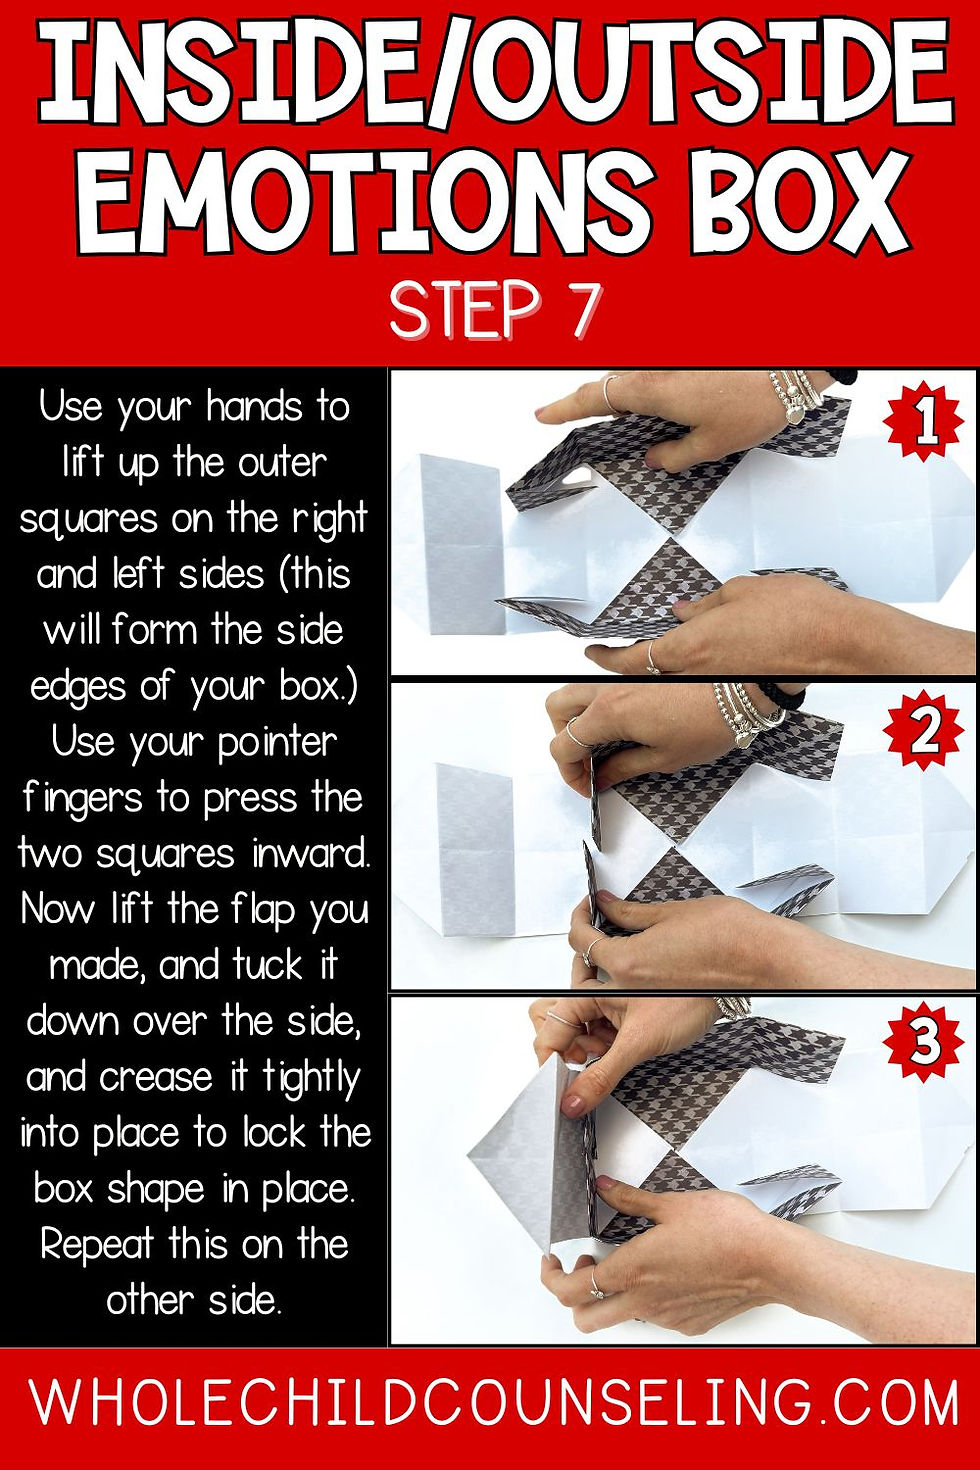
The cuts you made should create two flaps.
Now unfold the flaps you just created by cutting and have one side of the flap facing toward you.
Use your hands to lift up the outer squares on the right and left sides - this will form the side edges of your box.
Use your pointer fingers to press the two squares inward.
Now lift the flap you made by making the cuts, and then tuck it down over the side, and crease it tightly into place to lock the box shape into place.
Now turn the box around so you can repeat these steps on the remaining side. The last flap should be facing away from you.
Use your pointer fingers to press the two squares inward.
Now lift the last flap up, and then tuck it down over the last side. Crease it tightly into place to lock the box shape in place. If you want, you can place a small dot of glue or tape under the box to hold it into place.
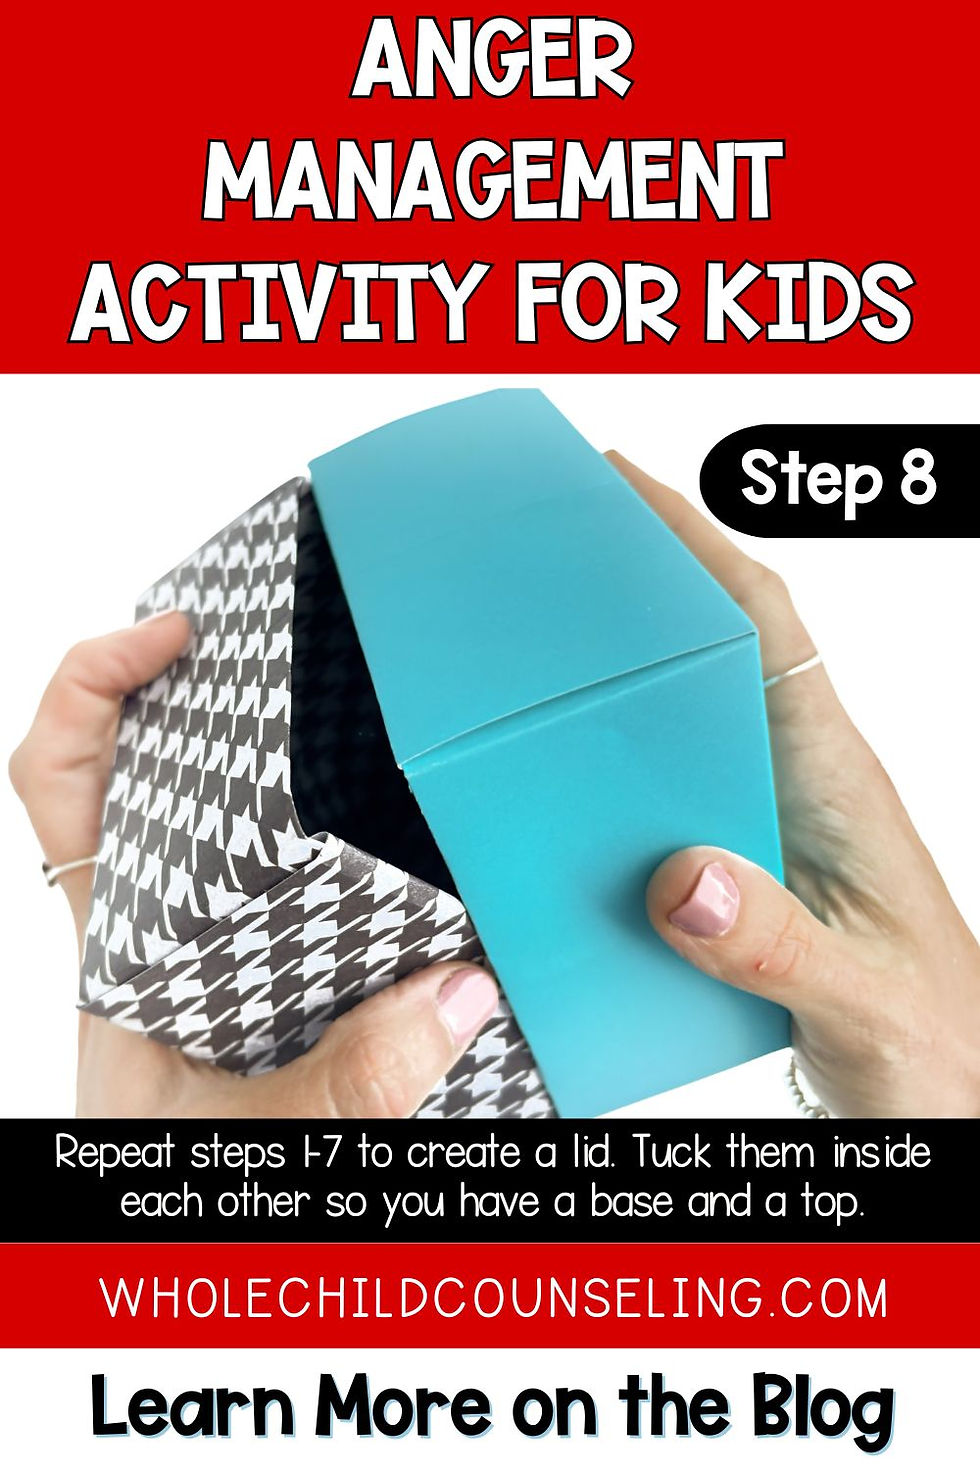
Origami Box Step 8: Create the Lid
Now you will repeat steps 1-7 above with a second square of paper to create a lid or base.
Once you have two box halves, you can tuck them inside each other so you have a base and a top.

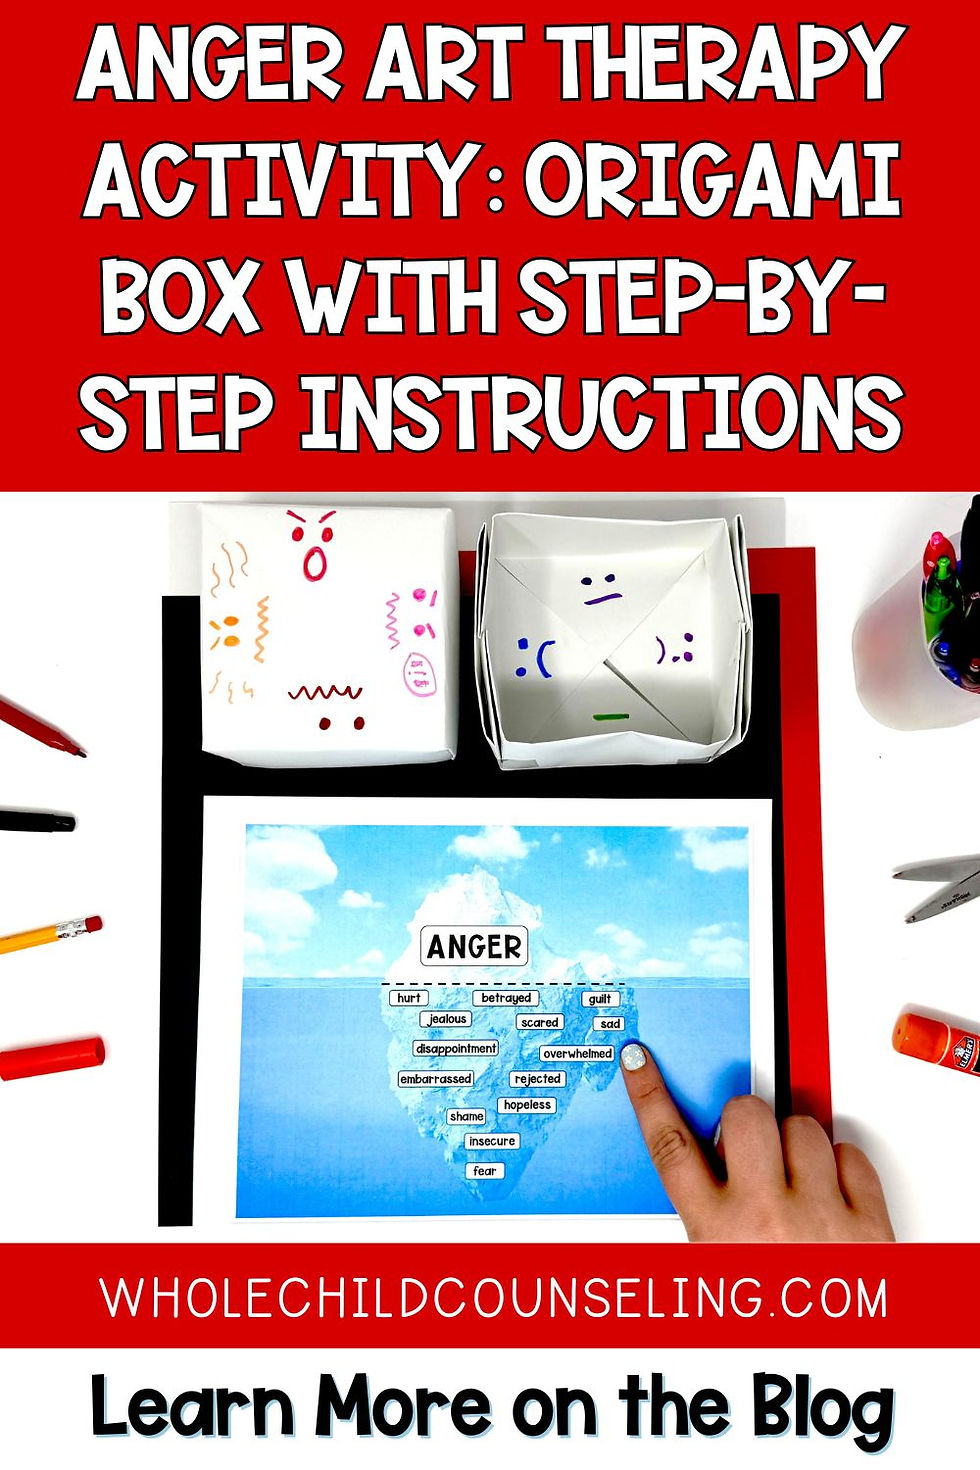
Inside/Outside Anger Art Therapy Box Prompt
This is a small excerpt about creating an inside/outside box for anger from the Anger Decoders curriculum, a comprehensive 10 week counseling program for tweens and teens. These sessions include a lot of other CBT and creative interventions for helping tweens and teens learn to manage their anger.
Practice making the origami box yourself before the session and have it as a model to show them. Tell students:
When I first learned how to make these boxes, I had a lot of unhelpful thoughts. It can be frustrating to do origami. It’s okay if you feel this way. If feelings come up for you when we do this activity, I want you to notice the feeling and name it. Then take a few slow, deep breaths and choose a more helpful thought. Let’s practice taking some slow, deep breaths together now…. Okay, if you start to get annoyed or frustrated when making this box, what helpful thought can you choose?
Now that you have your box, on the outside, I want you to decorate it with how you express your anger to the world. Think if anger were color, lines, shapes, or words, how would it show up?
You will decorate the inside of the box to represent one or more of those hidden emotions that can hide behind anger. Point to the anger iceberg poster.
There is no right or wrong way to do this! We’ll have [number] of minutes to work on this. When you’re done, you can share about it, or you can pass if you don’t want to share today.
If more time is needed for the art project, consider extending this activity to the following week.
Give a warning when they have a couple of minute left.
Before we finish today, let’s take a moment to think about what we learned.
We talked about how anger can sometimes be the emotion we show on the outside, but underneath, we might actually be feeling something else, like hurt, sadness, embarrassment, or disappointment.
Recognizing those other feelings can help us understand what’s really going on and help us respond differently to that other emotion, instead of just responding with anger.
We’ll go around and if you want to share about your inside/outside box, please do. If you don’t want to share today, that’s totally fine too; you can just say “pass.”

Anger Decoders: A Creative Counseling Curriculum for Tweens and Teens
The excerpt above was from Anger Decoders a 10-session counseling curriculum designed to help tweens and teens better understand, express, and manage anger using CBT strategies, art therapy, coping tools, and SEL activities. These sessions support middle schoolers and high schoolers in building lifelong emotional regulation skills through engaging, hands-on lessons.
In Anger Decoders, Students will Explore:
Anger triggers and the anger cycle
Physical signs of anger using interoception
Hidden emotions behind anger
Reframing negative thoughts
Assertive communication skills
Personalized coping strategies and toolbox creation...and more
In Anger Coders You'll get:
Scripted lesson plans and visuals
Reflective prompts and discussion questions
Printable anger worksheets and coping skills activities
Tools for building self-awareness, emotional regulation, and social-emotional growth
Why You'll Love Anger Decoders:
Breaks complex emotional concepts into teachable steps
Encourages real-world application of anger tools
Comes with 47 counseling objectives for IEP goals or clinical treatment planning
Includes pre-group and post-group surveys to track progress
Aligned with ASCA Mindsets & Behaviors
Whether you’re supporting students in individual sessions or small groups, Anger Decoders helps kids move from reactive to reflective, building confidence, calm, and emotional insight one session at a time.

More Counseling Prompts for Your Origami Box
The above example is for an inside/outside box focused on anger, but you can use many other prompts with this origami box. Here are a few ideas to get you started:
Emotion Box: Decorate the outside with how an emotion (like anger or anxiety) looks on the outside, and use the inside to show how it really truly feels on the inside.
Situation Box: Decorate the outside with how you show the world you are dealing with this situation (such as witnessing violence, a parent's divorce, an incarcerated parent, etc.) and how it looks on the outside to others, and use the inside to show how it really truly feels on the inside.
Coping Skills Box: Write or draw calming strategies and keep them inside for children to pull out when needed.
Safe Space Box: Have children create a safe space inside the box. Offer soft materials (feathers, felt, pom poms, etc.) to create a tactile calming tool.
Worry or Unhelpful Thoughts Box: Invite children to write or draw unhelpful thoughts or worries and tuck them away into the box.
Helpful Thoughts or Affirmation Box: Invite children to write or draw helpful thoughts or positive affirmations all over their box. They can also create blank slips of paper to add to their box over time.
Gratitude Box: Invite children to write or draw things they are thankful for all over their box. They can also create blank slips of paper to add to their gratitude box over time.
Conversation Starter Box: Have children write questions or prompts on slips of paper and keep them inside the box. Use it in groups to encourage sharing and build communication skills.
Compliment or Kindness Box: Children can decorate their box and then write compliments or kind notes to each group member (or themselves!) to place inside. It’s a great way to build peer connection or self-esteem.
Feelings and Needs Box: Children can place “feeling cards” and “need cards” inside the box to represent how they feel and what they need when they’re overwhelmed. Use this as a check-in or to build emotional literacy.
Strengths Box: Have children decorate the outside of the box with their personal strengths, talents, or positive traits. Inside, they can decorate or place notes about accomplishments or growth moments to remember.
Goals and Hopes Box: Children write short-term or long-term goals on slips of paper and keep them in the box. It can also be used to reflect on personal hopes, dreams, or intentions.
Memory Box: Invite children to decorate the box in memory of a loved one. Inside, they can place drawings, memories, photos, or words related to that person.
Then vs. Now Box: Use the outside to represent a past experience or trauma (in safe and developmentally appropriate ways). The inside can reflect how they feel now or what helped them grow.
Past/Present/Future Box: Divide the box into three parts. Then decorate one section for the past, one for the present, and one for the future. It can be a way to process change (like moving, starting a new school, etc.).
Identity Box: Kids decorate the outside with how others might see them, and the inside with how they see themselves. This can be especially impactful for middle schoolers or during identity-focused sessions.

Embracing Mistakes and Modeling Imperfection with Art Therapy
One of my favorite parts of doing art with kids, especially something like origami, is that it naturally brings up moments where things don’t go perfectly. A corner might not line up. A fold might tear the paper. You might forget a step and have to go back. And that’s not just okay, it’s actually valuable!
When we make art with kids and something goes "wrong," we’re given a moment to model resilience and self-compassion. Instead of rushing to fix the mistake or getting frustrated, we can slow down, take a breath, and say something like:
“Oops, I didn’t fold that quite right. That’s okay. I can still work with it.”
“This one’s not perfect, but I’m going to keep going and see what happens.”
“I had to redo mine too. It’s normal to mess up when we’re learning something new.”
These are small moments, but they can make a big impact, especially for perfectionistic kids or those who struggle with frustration tolerance. When we normalize mistakes, we’re helping kids internalize that it’s safe to take risks and try, even when the outcome isn’t guaranteed.
Art gives us the perfect space to practice this. There’s no “wrong” way to create. Even if your origami box turns out lopsided or wrinkled, it still has value. And sometimes, the “mistake” leads to something more creative or meaningful than what we originally planned.
You can also take it a step further and reflect with kids:
“How did you feel when it didn’t turn out how you expected?”
“What helped you keep going?”
“Can you think of another time you made a mistake but didn’t give up?”
These kinds of conversations help kids build a growth mindset and learn that mistakes aren’t failures, they’re just part of learning and creating. For more tips and activities to help kids with a growth mindset, check out these blog posts.

Art Therapy to Help Kids Go From “I Can’t” to “Look What I Made!”
Often, before we start on this activity and I first show children the finished origami box with a flat piece of paper, their reaction is almost always the same: wide eyes and immediate doubt. They say things like:
“I could never make that.”
“That looks too hard.”
“Mine will never come out like yours.”
These comments come from a place of uncertainty and a belief that the end result is too far out of reach. But when we break the process down step by step and go through it together, most kids do end up making the box.
By the time we finish, I see their entire posture shift. They’re holding it up, showing it off, even offering to help others and show their teachers. That’s not just about paper folding. That’s confidence being built in real time.
This art therapy inspired activity becomes a hands-on way to teach:
Growth mindset: Just because something feels hard at first doesn’t mean you can’t do it.
Persistence: Step-by-step, small progress adds up.
Self-efficacy: “I did something I didn’t think I could do.”
And when we pause to reflect on that shift, from “I’ll never be able to” to “Look what I made,” we give kids a chance to recognize their own growth. I’ll often ask questions like:
“Do you remember what you said at the beginning?”
“How did it feel to keep going even when it was tricky?”
“What does this show you about what you’re capable of?”
Activities like this might seem small, but they can be impactful and they can create big opportunities for emotional learning and self-belief. They remind kids (and let's face it, ourselves) that we’re all capable of more than we think, especially when we take it one fold at a time.

It's All About the Process in Therapeutic Art-Making

In art therapy, and in any therapeutic setting that includes creative expression, the process of making art is often more important than the finished product. That might sound surprising, especially in a world that often celebrates perfect outcomes, but in counseling, the real growth happens during the act of creating.
When kids are engaged in the process of making something, like folding an origami box, they’re doing so much more than making a craft:
They’re problem-solving as they figure out where to fold.
They’re practicing patience and attention to detail.
They’re managing frustration when something doesn’t go as planned.
They’re taking risks by trying something unfamiliar.
They’re learning to tolerate imperfection.
All of these moments are therapeutic, even if the box never quite lines up perfectly.
When we focus too much on the end product, whether it looks "good," whether it’s symmetrical, whether it matches someone else’s, we risk shifting the focus away from emotional expression and into performance. That can create pressure and self-judgment, especially for kids who already struggle with anxiety or perfectionism.
By contrast, focusing on the process helps kids:
Feel safe to experiment and explore
Express feelings without needing to explain them in words
Experience mastery through effort, not outcome
Build self-awareness and emotional regulation through sensory input and repetition
It’s okay if the box tears! It’s okay if the folds aren’t perfect! What matters is that the child stayed with the process, made choices, learned something about themselves, and felt seen in the act of creating.
As a counselor, it’s powerful to affirm the effort and emotional presence a child brings to the work, not just the end result. You might say things like:
“I love how you stuck with it, even when it got tricky.”
“You made some really creative choices here.”
“What part of this did you enjoy the most?”
"Tell me about the process of creating this. What did you notice?"
"What kind of thoughts did you have at the beginning? At the middle? And when you were done?"
"How did you feel when I told you what we were doing today, and how do you feel now? What changed?"
These kinds of comments help reinforce the idea that what kids do during art-making, how they show up, adapt, and reflect, is what truly matters.
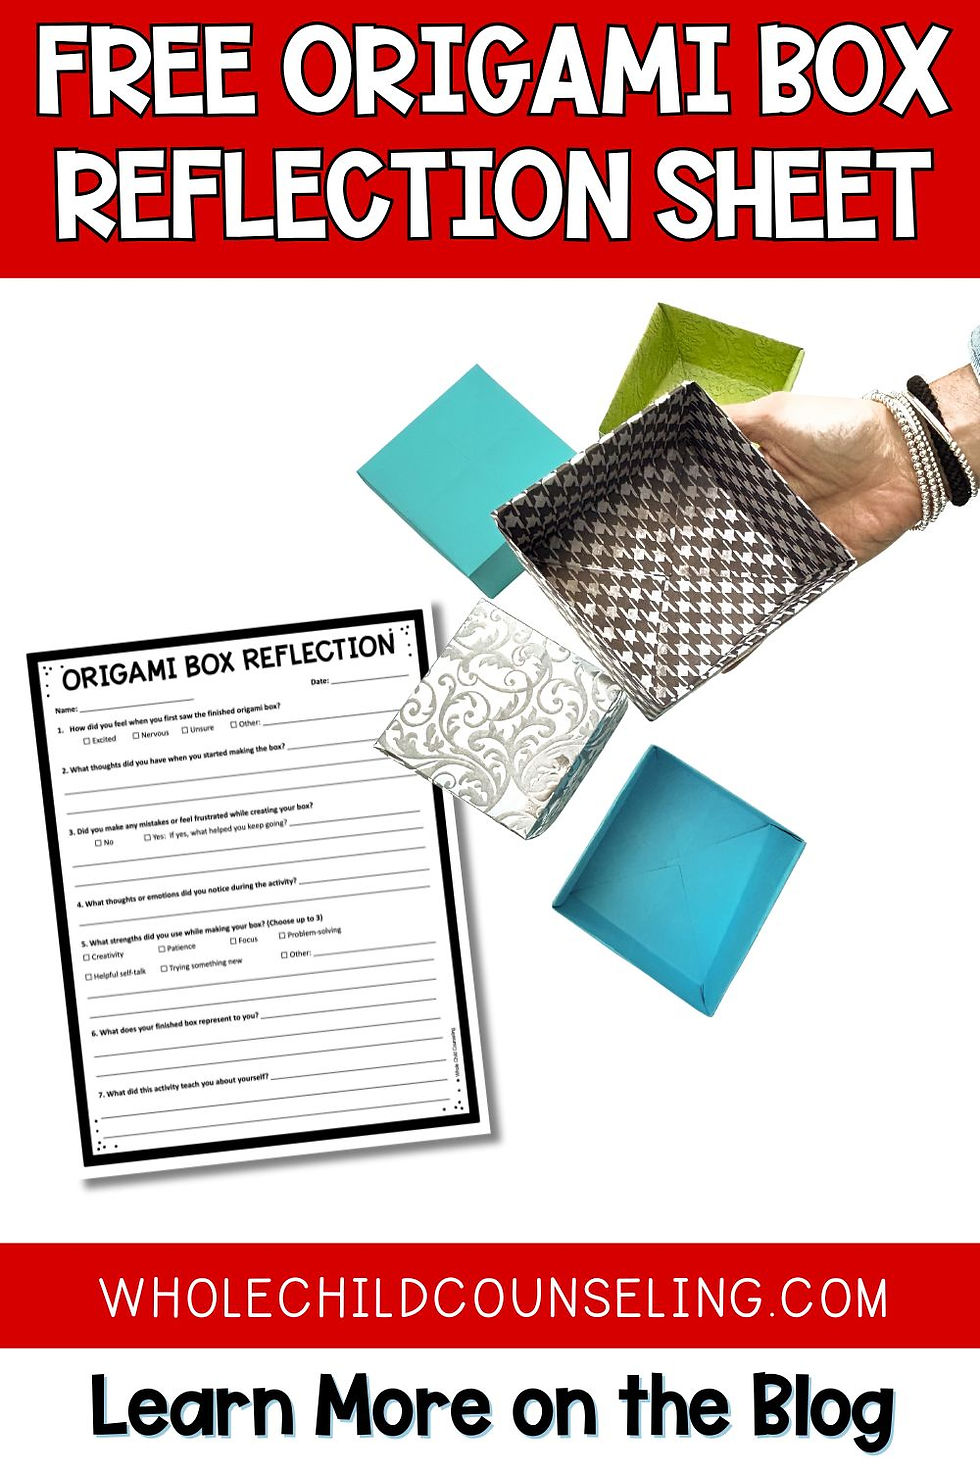
Free Origami Box Reflection Sheet
Origami boxes are more than just a fun craft. They can be a powerful tool to explore emotions, build self-awareness, and create personalized therapeutic projects with kids. Whether you’re a school counselor, social worker, or psychologist, I know this simple DIY paper box will be a great addition to your toolkit.
To get a free origami box reflection sheet, just subscribe to my email list and you'll get weekly emails from me with tips and resources, plus you'll gain access to my free SEL resource library.


